Unit III. The
Cell. Microscope Notes
A.
History of the Microscope:
1. Hans and Zacharias Janssen.
Credited with being the first to make a microscope
2. Robert Hooke. Coined the
term "cell" from living organisms using the microscope
3. Anton van Leeuwenhoek.
Identified many microorganisms using the microscope.
B. Parts of a Compound Microscope
The compound microscope is a
useful tool for magnifying objects up to as much as 1000 times their normal
size. Using the microscope takes lots of practice.
|
 |
- Ocular lens (10x)- the magnifying lens closest to your eye.
- Body Tube - holds the lenses the proper distance apart.
- Revolving Nose Piece - holds the objective lens and allows objectives
to be rotated for differing magnifications.
- Objectives are the lenses closest to the object (specimen).
- Scanning objective (4x) is lowest power and shortest. Used to locate
portion of specimen to observe.
- Low power objective (10x) - the middle length lens.
- High power objective (40x)- the longest length lens.
- Stage - supports the object (specimen).
- Stage Clips hold the object slides in place.
- Mirror - reflects light upwards through the slide.
- Substage Illuminator/light - shines light upwards through the slide.
- Base - supports the microscope.
- Diaphragm - controls the amount of light striking the slide.
- Arm/Neck - supports the body tube.
- Coarse adjustment knob - used to focus with scan objective.
- Fine adjustment knob - used to focus on low or high power objective.
|
|
Practice.
Microscope parts worksheet. |
C. Procedure for using a
Microscope
- Carry microscope with two hands, one on the arm the other on the base.
- With the arm towards you, place the microscope about 4" from the edge
of desk/lab bench. Make sure power cords will not catch on the user or
passersby.
- Verify the scanning objective lens is in place and that the stage is a
greatest distance from the scan lens.
- Look into ocular eyepiece; clean the lenses, mirrors or condenser if
needed with lens paper.
- Place slide over hole in stage and secure with stage clips.
- Looking from the side, use the coarse adjust knob to bring the stage
closest to the scan lens.
- Looking into the ocular, slowly increase the distance between the
slide and the scan lens until the specimen is in focus.
- Locate area of specimen you wish to view.
- Slowly rotate nose piece until the low power lens clicks into place.
- On low and high power objectives, always use the fine
adjustment knob, never use the coarse adjustment knob.
- Observe and sketch the specimen. To reduce eye strain, keep both eyes
open.
- Never allow the objective lenses to contact a slide or
specimen. If you must use the coarse adjust start again at step
6.
- When finished, rotate the scan objective into place.
- Use the coarse adjustment knob to drop the stage and remove the slide.
- Bring the body tube to an upright position and wrap the cord around
the base.
- Return the microscope.
|
|
D. Properties of a Microscope
-
The objective lenses of
compound microscopes are parfocal. You do not need to refocus when
switching to a higher power if the object is in focus on a lower power.
-
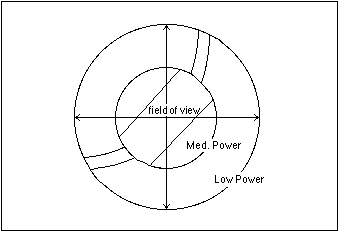
The
field of view is largest on the lowest power objective. When you
switch to a higher power, the field of view is reduced. You will see more
of an object on low power. Therefore, it is best to find an object on low
power, and then switch to higher power.
-
The
depth of focus is greatest on the lowest power objective. Each time
you switch to a higher power, the depth of focus is reduced. Therefore a
smaller part of the specimen is in focus at higher power. Again, this
makes it easier to find an object on low power, and then switch to higher
power after it is in focus.
-
The amount of light transmitted
to your eye is greatest at the low power. When you switch to a higher
power, light (and therefore resolving power, or the ability to distinguish
two nearby objects as separate) is reduced. Compensate with the light
control (sometimes called the iris).
|
| |
|
Field of View
|
| |
|
Depth of Focus

|
|
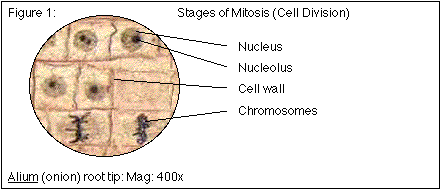
| E. Microscope Drawings
When drawing what you see under
the microscope, follow the format shown below. It is important to include a
figure label and a subject title above the image. The species name (and
common name if there is one) and the magnification at which you were viewing
the object should be written below the image. All relevant parts of the
drawing should be labeled on the right side of the image using straight
lines. Lines should not cross. Drawings should be done in pencil, while
labels should be in pen or typed. Remember that total magnification is
determined by multiplying the ocular x objective.
|
F. Viewing Prepared Slides
-
Start by rotating the objective
lens to lowest power.
-
Place a slide on the stage,
label side up, with the coverslip centered.
-
On LOW POWER ONLY, use
the coarse focus knob to get the object into focus.
-
If you cannot see anything,
move the slide slightly while viewing and focusing.
-
If nothing appears, reduce the
light and repeat step 4.
-
Once in focus on low power,
center the object of interest by moving the slide.
-
Rotate the objective to the
medium power and adjust the fine focus only.
-
If needed, rotate the objective
to the high power and adjust fine focus only.
|
|
Lab Practice:
Using the microscope |
Additional Links:
Check out this great collection of
online
microscopy resources. A particularly nice site to explore is
Microbes.info
Advanced Topic.
Electron microscopy.
University of Georgia
Really Cool images under the
microscope
How light
microscopes work. HowStuffWorks.com
Anatomy & Physiology pictures
under the microscope